This site is being phased out.
Binary images - implementation
Start with Binary Images.
In this article the algorithm for analysis of binary images (what runs Pixcavator) is explained in detail and illustrated with C/C++ source code. MATLAB may be a better illustration tool, in general. However it does not support pointers which is a key here.
The time complexity of the algorithm is O(n2), where n is the number of pixels in the image.
Contents
Version 1
The data structure
The input image of the algorithm is a binary 2D image, i.e., an array of 0s and 1s with dimensions dim1 and dim2.
bool image[ dim1*dim2 ];
The algorithm partitions the image by providing boundaries of the objects. Geometrically, these boundaries are circular sequences of directed edges of pixels in the image. In other words, these are 0- and 1-cycles. The first task is to count them.
long betti[2] = {0,0}; // Betti numbers = number of current cycles of each dimension
At each step we will update a Boolean array - the current frame.
bool *CurrFrame = new bool [ dim1*dim2 ];
As pixels are added, this array is incrementally changed - pixels are added - and analyzed by the algorithm. At every step, the cycles that have no descendants are called current cycles. Similarly, the edges that represent current cycles are called current edges. They are exactly the edges of objects visible in CurrFrame.
Cycles in the image are represented by nodes in the graph. In this graph, the cycles are related to each other to record the changes in the topology of the image in terms of merging and splitting of components and holes as the image develops. In particular, the 0- and 1-Betti numbers are updated at every step. The graph is implemented as a linked list. Each element of the list has pointers to the descendant(s) of the cycle. For the sake of image simplification and visualization, the list of current cycles has to be maintained at all times. Therefore, we have pointers to the next and previous current cycles on this list.
struct Cycle
{
struct Cycle *next[2]; // it may split
int Dim; // dimension
struct Cycle *linkF, *linkB ; // pointers to other current
                              // cycles on the list, forward and back
}
Thus, the data structure for the image is an acyclic binary directed graph. The regions and holes are represented as nodes of this graph. Each node representing a region or hole is connected to the nodes representing regions and holes that existed previously (its parents) or appear later (its children) by directed edges, or arrows, of the graph. The arrows (one or two from each node) indicate merging and splitting of the regions as we add vertices, edges, and pixels, Adding Pixels. There are no circular sequences of arrows. Each node of the graph contains a pair of links (pointers) to next nodes. If the cycle is merged with another, one link used, if it splits, two. This information is used even after the cycle ceases to be current, i.e., after a merge or a split.
We also connect each edge in the image to the cycle it created when the edge is added. This allows one to find the current cycle corresponding to a given edge. This is accomplished by following the pointer from the edge to its original node and then following the links of the graph to find the current node. This approach allows one to avoid reassigning these cycles to each edge of the new cycle (like relabeling of components) after every merge. In addition, only one of the two cycles emerging after a split has to be reassigning . This is implemented later.
The following command creates a node for the given edge.
struct Cycle *CreateCycle( int *edge )
{
struct Cycle *Cycle0 = new struct Cycle;

Cycle0->next[0] = NULL;  Cycle0->next[1] = NULL ; // no kids so far
Cycle0->Dim = 0;// to be determined

Cycle0->linkF = NULL Cycle0->linkB = NULL;// disconnected from the the list of current cycles so far

GiveCycle( edge, Cycle0 );// assign the edge to the cycle, below
AttachCurrCycle( Cycle0 );// add the cycle to the current list, below

return(Cycle0);

}
We maintain the list of current cycles by the commands below. The first one adds the node to the list by attaching it behind the last current cycle.
struct Cycle LastCurrCycle;

void AttachCurrCycle( struct Cycle *Cycle0 )
{
if( LastCurrCycle == NULL ) LastCurrCycle = Cycle0;
else
{ Cycle0->linkB = LastCurrCycle;
LastCurrCycle->linkF = Cycle0;
LastCurrCycle = Cycle0;
}
}
The second command removes the node of the given cycle from the list and updates the list. It is used when a cycles ceases to be current.
void DetachCurrCycle( struct Cycle *Cycle0 )
{
if( Cycle0 == LastCurrCycle ) LastCurrCycle = Cycle0->linkB;

if( Cycle0->linkF != NULL ) Cycle0->linkF->linkB = Cycle0->linkB;
if( Cycle0->linkB != NULL ) Cycle0->linkB->linkF = Cycle0->linkF;

Cycle0->linkF = NULL;
Cycle0->linkB = NULL;

}
A look-up list of all current edges is also maintained so that all current edges have pointers to corresponding cycles. Each edge is a 4-vector given by 2 integers representing the location of its initial point and 2 integers (from -1, 0, and 1) representing its direction.
EdgeToCycle = new struct Cycle *[ (dim1+1)*(dim2+1)*3*3 ];
There may be also a pointer from each node to one of the edges. This pointer provides a starting point for the boundary. This makes it possible to recover the cycle explicitly whenever necessary by following edges so that black pixels are to the left and white to the right of the edge. Thus, neither components nor their boundaries have to be explicitly recorded.
The run through pixels of the image
At every step of the run through the image, the value of the pixel in the image is considered. If the color is white, skip to the next step. If the color is black, execute AddCell. Every time a cell is added, the topology of the image changes, the graph, the list of current cycles, and the Betti numbers are updated.
for( k=0; k < dim1; k++ )// start the (k,l) pixel
for( l=0; l < dim2; l++ )
{

if( CurrFrame[ l+dim2*k ] == 0 )// if the new pixel is black..
   AddCell( k, l );

}
The AddCell command first adds one by one each of the 4 vertices of the pixel unless that vertex is already present as a part of another pixel. It has then a pointer to a cycle. AddVertex creates a node of the directed graph for each of these vertices. Next AddEdge adds one by one each of the 4 edges unless that edge is already present as a part of another pixel. It has then a pointer to a cycle. AddEdge either creates one node if this is a merge or two nodes if this is a split. The links for these nodes come from the SplitCycle and MergeCycles commands described below. The last step of AddCell is to add the pixel itself by removing the 1-cycle made of its 4 edges going counterclockwise.
void AddCell( int x1, int x2 )
{
int point[2];// adding vertices…
point[0]=x1;   point[1]=x2;   AddVertex( point ) ;
point[0]=x1+1; point[1]=x2;   AddVertex(point );
point[0]=x1+1; point[1]=x2+1; AddVertex( point ) ;
point[0]=x1;   point[1]=x2+1; AddVertex( point);

int edge[4]; // adding edges..
edge[0]=x1;   edge[1]=x2;   edge[2]=1;  edge[3]=0;  AddEdge( edge);
edge[0]=x1+1; edge[1]=x2;   edge[2]=0;  edge[3]=1;  AddEdge( edge );
edge[0]=x1+1; edge[1]=x2+1; edge[2]=-1; edge[3]=0;  AddEdge( edge );
edge[0]=x1;   edge[1]=x2+1; edge[2]=0;  edge[3]=-1; AddEdge( edge );

struct Cycle *Cycle0 = GetCycle( edge ); // removing the 1-cycle from the list of current cycles...
   DetachCurrCycle( Cycle0);

// marking the counterclockwise edges non-current
edge[0]=x1;   edge[1]=x2;   edge[2]=1;  edge[3]=0;  GiveCycle( edge, NULL );
edge[0]=x1+1; edge[1]=x2;   edge[2]=0;  edge[3]=1;  GiveCycle( edge, NULL );
edge[0]=x1+1; edge[1]=x2+1; edge[2]=-1; edge[3]=0;  GiveCycle( edge, NULL );
edge[0]=x1;   edge[1]=x2+1; edge[2]=0;  edge[3]=-1; GiveCycle( edge, NULL );

betti[1]--;

}
Creating a node means allocating memory for the data. By removing a node from the graph one may understand either its physical removal from the memory or simply marking it as non-current.
void AddVertex( int point[2] )
{ int edge[4];

edge[0] = point[0];
edge[1] = point[1];// location
edge[2] = 0;
edge[3] = 0;// no direction

struct Cycle *Cycle0 = CreateCycle( edge );
Cycle0->Dim = 0;

betti[0]++;

}
Unlike these two commands, the AddEdge command may changes the topology of the rest of the image. It is explained below.
Adding edges
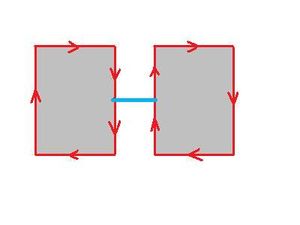
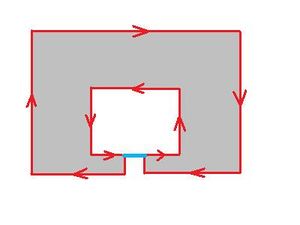
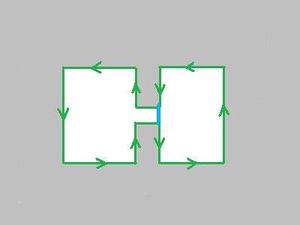
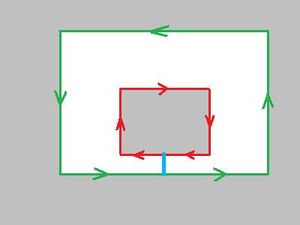
Next, we describe under what circumstances MergeCycles and SplitCycle are executed. There are 4 cases.
void AddEdge( int *edge )
{
// find the next edge
int forward[4]; StepForward( edge, forward, 0 );// below

// find the cycle corresponding to that new next edge
struct Cycle *CycleForward = GetCycle( forward );// below

// find the edge pointing the other way
int back[4]; Reverse( edge, back );

// find the next edge – in the opposite direction
int backward[4]; StepForward( back, backward,0 );// below

// find the cycle corresponding to that new next edge
struct Cycle *CycleBack  = GetCycle( backward );

int dim = CycleForward->Dim;

if ( CycleForward != CycleBack )
 MergeCycles( CycleForward, CycleBack, edge, back, 0 );
     // (a) 0 is the dimension of the new cycle
else
 SplitCycle( CycleForward, edge, back, 1 , dim );
    // (b) or (c) 1 and dim are the dimensions
    // of the new cycles

}
Exercise Implement the command Reverse (turning an edge in the opposite direction). Answer
To make the correct choice between MergeCycles and SplitCycle, there should be a quick way to identify the cycle corresponding to a given edge. This look-up procedure is called GetCycle. For this purpose, a look-up list is maintained. For each edge E, the list contains a pointer to the node that represents the cycle created when E was added (this pointer is NULL if the edge is not current). To make the algorithm fast, this list is only updated by SplitCycle. While traversing one of the created cycles it assigns to the edges the node corresponding to this cycle, next section.
For a given edge, GetCycle is carried out as follows. First step, use the look-up table to find the cycle node corresponding to the edge. Originally, it is the cycle created when this edge was added, later possibly reassigned by SplitCycle. Therefore, the cycle node may be non-current. Second step, starting from this node, follow the links of the directed graph as far as possible. The result is the current node and the current cycle corresponding to the edge. Because this is a binary graph, the search of the current cycle of a given edge is unambiguous. This is assured by following the two rules (1) in SplitCycle, reassign the edges of the first (next[0]) of the two cycles being created, (2) in GetCycle, follow the second link (next[1]) at each split.
struct Cycle *GetCycle( int *edge )
{
struct Cycle *temp;

temp = EdgeToCycle[edge[0]*(dim2+1)*3*3+edge[1]*3*3+(edge[2]+1)*3+(edge[3]+1)];

if( temp == NULL ) return(0);

while( temp->next[0] != NULL )  // if there are kids...
{
if( temp->next[1] != NULL )
  temp = temp->next[1]; // it’s a split
else
  temp = temp->next[0]; // it’s a merge
}

return( temp );

}
The following command assigns the given node to the given edge.
void GiveCycle( int *edge, struct Cycle *Cycle0 )
{

EdgeToCycle[edge[0]*(dim2+1)*3*3+edge[1]*3*3+(edge[2]+1)*3+(edge[3]+1)] = Cycle0;

}
Merging and splitting cycles
Next, we describe how MergeCycles and SplitCycle are executed.
Recall that for SplitCycle the numbers dim1, dim2 are the dimensions of the new cycles. As a result, a new cycle of dim1 or dim2 is gained.
void SplitCycle( struct Cycle *Cycle0, int *edge1, int *edge2, int dim1,  int dim2 )
{
struct Cycle *Son1 = CreateCycle( edge1 ) ;
struct Cycle *Son2 = CreateCycle( edge2 ) ;

TraverseCycle (edge1, Son1); // below

if ( Son1->Dim == dim1 )
 Son2->Dim = dim2;
else
 Son2->Dim = dim1;

Cycle0->next[0] = Son2;
Cycle0->next[1] = Son1;

DetachCurrCycle( Cycle0 ); // not current any more

if ( dim1 == 0 && dim2 == 0 )
 betti[0]++;
else
 betti[1]++;

}
Exercise Modify the above command to compute the perimeters of Son1 and Son2 based on the perimeter of Cycle0.
Exercise Same for the area.
Recall that for MergeCycles the number dim is the dimension of the new cycle. As a result, a cycle of dimension dim is lost.
void MergeCycles( struct Cycle *Cycle1, struct Cycle *Cycle2, int *edge1, int *edge2, int dim )
{

struct Cycle *Son = CreateCycle( edge1 );
Son->Dim = dim;

Cycle1->next[0] = Son;
Cycle2->next[0] = Son;

DetachCurrCycle( Cycle1 );// not current
DetachCurrCycle( Cycle2 );// not current

betti[dim]--;

}
Traversing cycles are only done during the SplitCycle command and only for the first of the two new cycles.
Exercise Modify the above command to compute the perimeter of Son based on the perimeters of Cycle1 and Cycle2.
Exercise Same for the area.
Traversing cycles
Traversing the cycle is accomplished by means of repeated application of the StepForward command below. From a given directed edge, StepForward moves to the next directed edge that must already be current. The next edge is found by checking which of the four possible next edges is current. This is verified by means of the look-up table and the GetCycle command. These edges are tested in this order from the end of the given edge, step left, step forward, step right, step backward (same edge directed backward). The command supplies the next edge of the cycle and also records whether it was left or right turn.
Exercise. Implement commands Plus (adding vectors), Turn (turning a vector left or right), Negative (turning a vector in the opposite direction).
void *StepForward( int *edge, int *temp, int *LR )  // ..from edge to temp edge

{ int black = 0; // 0 until we’ve found the next edge - temp

if( edge[3] == 0 && edge[2] == 0 ) // in case the edge is a vertex..
          black = 1; // do nothing

int d[2]; d[0] = edge[2]; d[1] = edge[3]; // original direction

if( temp != edge )
  {  temp[0] = edge[0]; temp[1] = edge[1]; // copy initial point
     temp[2] = edge[2]; temp[3] = edge[3]; // ...and direction
  }

temp = Plus(temp); // move forward – update the initial point
// next, find and update the direction

int i=0; // 4 possible directions
int lr=0; // 1 left turn, -1 right

while( black == 0 && i < 4 ) // 4 directions
{ temp[2] = d[0]; temp[3] = d[1]; // original direction of edge

// choosing the new direction...

switch( i )
{
case 0: Turn( temp, -1 )  lr = 1; break; // right turn
case 1:                   lr = 0; break; // straight
case 2: Turn( temp, 1 );  lr = -1; break; // left turn
case 3: Negative( temp ); lr = 0; break; // back
}

if (GetCycle(temp) != 0) // there is a current edge there..
         black = 1;      // then done
i++ ;
}

if ( black == 0 ) // no next edge – the edge is a vertex
{ temp[2]= 0; temp[3] = 0; lr = 0; }

if( LR != NULL ) *LR = lr; // the turn

}
As a result, one goes around the cycle until the initial edge is reached again. Traversing a cycle can also be carried out by simply maintaining a list of cycles as sequences of edges or vertices.
While traversing the cycle, the dimension of the cycle is determined by evaluating the total turn – if it is right (clockwise) the dimension is 0, otherwise it is 1. During the execution the cycle is assigned to all edges.
void TraverseCycle( int *edge, struct Cycle *Cycle0 )
{ int LR=0; // left-right turn
int Turn=0; // total turn (in the end it’s 4 or -4)
int temp[4]; // current edge
GiveCycle( edge, Cycle0 );
StepForward( edge, temp, &LR ); // first step
GiveCycle( temp, Cycle0 ) ;
while( edge[0]!=temp[0] || edge[1]!=temp[1] || // until the same edge..
edge[2]!=temp[2] || edge[3]!=temp[3] )
{
Turn+= LR; // total turn
StepForward( temp, temp, &LR ) ;
GiveCycle( temp, Cycle0 ) ;
}
if( Turn > 0 )
Cycle0->Dim = 1; // counterclockwise
else
Cycle0->Dim = 0; // clockwise
}
Version 2
The VS solution is available upon request.
The difference in implementation is discussed below. The executable along with a few binary bitmap images is here [1].
The goal of this document is to explain the system structure of the Binary Analysis System. For each of the system sub modules, we will explain the goal of the module, notable functions, etc. Also, we will note differences between the system implementation and the book implementation, citing specific areas of text where necessary.
At the heart of the Image Analysis system is a set of classes located in the BinaryEngine.cpp file. These classes, as well as their functions, are declared in the BinaryEngine.h file. The classes which are part of the BinaryEngine are: CEdge, CCycle, CMemoryManager, and CBinaryAnalyzer. Within these classes, a global EdgeDirection enumeration is used.
It is very common in all of these classes that some sort of evaluation based on edge direction is needed. For better readability, a global edge enumeration was created. The Enumeration is defined as follows:
EdgeDirectionNone = 0;
EdgeDirectionRight = 1;
EdgeDirectionUp = 2;
EdgeDirectionLeft = 3;
EdgeDirectionDown = 4;
Difference:
Above, all of the edge directions are hard coded in the implementation. While the corresponding Edge Direction values are consistent in each (the text and program), the subtle change does add some clarity to program. For example, the way an edge is declared in version 1:
int edge[4]; edge[0]=x; edge[1]=y; edge[2]=1; edge[3]=0;
However, an edge in the program is declared like this:
CEdge edge(X + 0, Y + 0, EdgeDirectionRight);
CEdge Class
The CEdge class provides a way to encapsulate the location of specific edges within a cycle. This includes the (X, Y) coordinate of the specific edge on the plane, as well as the direction of that edge (described above). The functions encapsulated in this class are described below.
TurnLeft() => Turns the edge direction left, depending on the current direction.
TurnRight() =>  Turns the edge direction right, depending on the current direction.
TurnBack() => Turns the edge direction backwards, depending on the current direction.
Reverse() => Moves the (X,Y) coordinate of the edge one step forward, and then turns the edge direction backwards.
Difference
In version 1, a lot of this functionality is implemented via functions that are decoupled from the variables of the operation. For example, to reverse an edge in the book you have to (page 6-63):
int back[4]; Reverse(edge,back);
Here that operation is encapsulated as a function of the C++ CEdge object. This is a common difference between C and C++ programming.
CEdge back(edge); back.Reverse();
CCycle Class
The CCycle class provides an encapsulated location of a specific cycle in the image. One of the more important things to note is how the CCycle class stores difference representation of the Cycle in a linked list data structure. Each Cycle State has children and parents that can be accessed by the Next[2] and Prev[2] arrays. This way, the Cycle can be consistently updated (via merges and splits) throughout the programs computation. Also, there is another linked list, accessed by linkB and linkF, that provides links to different cycles in the image.
Active => Defines whether that Cycle is active in the computation.  Activeness is computed after a Simplify is selected.
Dim => The Dimension of the Cycle.
Area => The Area of the Cycle.
Difference
In version 1, the code is implemented in C, rather than C++. Because of this, the code is not Object Oriented. Thus, a Cycle in the book is implemented by using Structs rather than objects. This is implementation above:
struct Cycle { struct Cycle next[2]; // it may split int Dim; // dimension // pointers to other current struct Cycle linkF, linkB; // cycles on the list, forward and back};
Here the code is Object Oriented, thus it is implemented with objects. Also, it should be noted that in version 1, the Cycle State linked list can only move forward (there is a Next, but not a Prev). In the program, a double linked list is used, so a Prev is available.
CMemoryManager Class
The general goal of this class is to provide a more elegant way to allocate memory to the CCycle objects. This is done because each allocated CCycle is stored in a CArray. Because of this, allocating a new Object requires some logic. Think of this class as a thin Builder class with some logic.
Difference
Because the program is implemented in C++ and the book is implemented in C, version 1 really had no reason to have this logic. However, due to the added functionality of the system, the program needs this class to store all allocated objects.
CBinaryAnalyzer Class
This is the class that actually does the analysis of the Binary Image. There are some functions within this class that are very important to the functionality of the system. Some of the main functions are:
GiveCycle(), GetCycle(), AttachCurrCycle(),DetachCurrCycle(), CreateCycle(), StepForward(),
TraverseCycle(), SplitCycle(), MergeCycle(), AddCell(), AddEdge(), and AddVertex().
Below is an explanation of the functionality of each.
GiveCycle()
This function assigns a given edge to a given cycle. To accomplish this, each edge is assigned an ID (determined by a hash function). Each hash value is used as an index to an array called EdgeToCycleArr. The value assigned to the index of the array is the specified Cycle.
GetCycle()
This function searches through the EdgetoCycleArr array in order to find a cycle to the specified edge. Once a cycle is found, this function iterates through the different States of that cycle in order to get the complete Cycle“ in other words, the cycle that includes any Merges or Sorts that may have been part of the computation at that point.
AttachCurrCycle()
This function attaches a specific cycle to the list of Cycles. These different cycles are accessed through linkF and linkB.
DetachCurrCycle()
This function detaches a specific cycle from the list of Cycles.
CreateCycle()
This function creates a cycle for a specified edge. The function handles all of the memory allocation, edge assignment, etc.
Difference
Version 1 does not have the following if statement in the CreateCycle() function:
if (edge.Direction != EdgeDirectionNone){CEdge back(edge); back.Reverse();GiveCycle(back, pCycle);}
The explanation for this code is as follows: When a 'physical' edge is added, both 'algebraic' edges, back and forth, are marked as current/active. So let's mark the reversed edge as current. This code is not provided in version 1.
StepForward()
The StepForward() command moves the (X,Y) coordinate one position in the direction of the EdgeDirection variable.
Difference
Version 1 implementation of the StepForward function differs greatly from the program's implementation.
These two functions accomplish the same thing.
TraverseCycle()
This function traverses the entire cycle by picking a starting edge and following that edge along the outer part of the cycle until the initial edge is computed again.
Difference
Version 1 implementation of the TraverseCycle function differs greatly from the program's implementation.
These two functions accomplish the same thing.
SplitCycle()
This function splits two cycles, creating two sons and adjusting the Cycle State linked list accordingly.
Difference
Here next[0] and next[1] assign two different cycles, depending on which version you look at (version 1 or version 2).
Also, the way the Betti numbers are assigned is different, depending on the version.
MergeCycles()
This function merges two cycles, creating a son and adjusting the linked list accordingly.
Difference
The way the Betti numbers are assigned is different, depending on the version.
AddEdge()
This function adds an edge to the in memory structure of the image. This includes deciding when to merge/split cycles with other cycles.
AddCell()
This function adds a cell, which is a collection of four points with four edges. This function does the necessary memory management and cycle assignment.
AddVertex()
This function takes and (X,Y) coordinate, makes a cycle out of it, and adds it to the in memory lookup structures.
Exercise. Add to TraverseCycle the option of plotting cycles, with different colors for different cycles.
Exercise. Create a simple interface for the program with output only the Betti numbers of the image. Verify the correctness of the Betti numbers for some sample images.
Exercise. Use the list of current cycles to plot them, one by one.
Exercise. Design the algorithm for hexagonal and triangular cells. Answer
Exercise. Design an algorithm for cells arranged in a circle as in a retina. Answer
Exercise Implement computation of the perimeter of a cycle. Add Cycle0->Perimeter to the structure.
Exercise. Implement computation of the area enclosed by a cycle. Add Cycle0->Area to the structure. Hint: use Green’s theorem [2].
Exercise. Design a character recognition system. Answer
